
With more and more states legalizing marijuana an increasing number of people are interested in growing their own. There is a wealth of information online about growing cannabis and there are countless methods for cultivating your crop. Online forums are full of heated discussions on the best techniques and the right way to go about growing. Readers will find strong opinions on every aspect of cultivation. Today growers are faced with so many options when deciding to grow marijuana that it can be difficult to make some of the important decisions when setting up your garden. Indoor or outdoors? Hydroponic or soil? Starting from seed of from clones? What type of nutrients should I use, how much, how often? When is my plant ready to harvest and how do I dry, cure and trim my flower after harvest? These are just some of the basic questions growers have and with so much information and so many choices about every option making a choice can be daunting. This guide is not intended to be a once size fits all definitive answer as to the best way to grow cannabis. Years of practice, trial and error will be a part of the journey to growing great cannabis and no blog post will replace that experience. In this guide I will be focused on a legal outdoor grow in the state of Vermont. This is a method that works for me, my property and my needs as a grower.
A legal grow in Vermont must meet the following requirements
- No more than 2 mature plants at a time per household.
- Your grow must be secured. The law is pretty vague on this but basically your garden should be enclosed and out of view weather that is fenced in or in a greenhouse or indoors is up to you.
- At the time of writing this article you cannot sell marijuana but you can give or receive a gift of up to 1oz of marijuana. It is also illegal to buy or sell cannabis seeds or plants.
- For a more detailed outline of Vermont’s evolving marijuana laws click here
The easiest way to extend your outdoor grow season in Vermont is to build a greenhouse. There are countless greenhouse kits available and an endless supply of free plans on the Internet. Choose a design that works for your space. Be sure to consider how you will control the temperature in the greenhouse, mainly how you will keep it cool enough when the summer sun is blasting. Good ventilation and temperature control is critical to a good harvest. Some other benefits of growing in a greenhouse include precise control over when and how much your plants are watered, built in security, protection from pests like rodents, and deer. Having grown plants right in the ground outdoors, indoors and in a greenhouse, a greenhouse is my preferred method because of the control it offers while still taking advantage of the best light source for your plants; the sun. The following techniques can be applies to both true outdoor grows and indoor grows as well but there will be some greenhouse specifics included.
It all starts with a seed
Vermonters are faced with a shorter growing season with warm spring weather arriving later and cold fall nights coming sooner using a greenhouse helps extend that season but unless you have sufficient insulation and heating your still faced with a relatively short season. Careful research should be done to choose a strain that will be ready to harvest before the cold comes.
The first step in any grow is getting your hands on some quality genetics and finding the seeds you want to grow. When growing in greenhouses in Vermont there are a few factors to take into account. You will want to find a strain that is resistant to temperature swings and any strain grown in a greenhouse should have mold resistant traits, as humidity often becomes a factor. As with straight up outdoor grows finding a strain that is also resistant to pests is a good idea. There are countless seed banks online if you do a little digging and instagram has proven to be a valuable resource for making connections with breeders and finding some unique local genetics specially suited to the climate here in Vermont.
Put in the prep work
Before germinating your seeds you should make sure that your setup is ready and the environment in your greenhouse is prepared. You should have your pots, soil, and climate control setup before you pop your first bean.
The climate control on my greenhouse is pretty simple. I have automated window openers, which consist of a wax filled tube which expands or contracts based on temperature. If it heats up they expand and open the vent windows. These windows are positioned across the top ridge of the roof and the bottom of the front wall. I also have a box fan in the bottom window and a powerful exhaust fan and ducting setup hooked into an inkbird temperature controller if temps get too high the fans come on and cool things down. These fans run for much of the summer. I also run a few smaller clip fans inside the greenhouse to help circulate fresh air through the plants.
For my outdoor plants I use large pots 10 or more gallons. I prefer air pots or fabric pots that air prune the roots and encourage healthy root growth. When growing in a greenhouse you want to limit the moisture and standing water attract pests so I place these pots in saucers and shop vac out any runoff and remove it from the greenhouse. Plus you don’t want your plants sitting in the runoff anyway.
Growing organic marijuana is a time honored tradition here in Vermont and has been since long before the summer of 2018. I work to create a super soil amended with all the nutrients it will take to bring a plant from seed to harvest. I amend the soil as needed with worm casting based compost teas or dry top dressing depending on what the plants want.
Pop those beans
There are a number of ways to germinate your seeds. I like to keep it simple and I have had great success with this method.
- Soak seeds for 18-24hrs in water
- Prepare a pot with airy compost mix, I prefer Vermont Compost Fort Light Mix. I pre water this mix with ph’d water being sure not to oversaturate the mix and then let it dry out a bit before planting the seeds
- Plant seeds in damp but not soaked soil
- Wait a couple days and boom you’ve got seedlings.
- I start all my seedlings on a seeding mat @75 degrees and under a humidity dome.
Transplanting
After the seedlings have taken hold and solid vegetative growth has begun I move my plants straight into their final growing container. I often plant in solo cups to start and like to cut the bottom off of one cup and make a slit all the way down one side of it then place it inside another cup which has drainage holes in the bottom. When it come time to transplant just slide out the inner cup and place in its new home and remove the cup sleeve in an effort to stress the young plant as little as possible. Once the plant has recovered you can begin training if this is part of your growing plan.
Training
Training your marijuana plants can be a great way to increase your yield. By exposing more of the plant to the sun and creating multiple dominant colas instead of one main cola. I recommend reading up on mainlining and creating a manifold. This process of topping and training the plant to develop numerous bud sites and devoting equal energy to each can have huge payoffs. Of course if you have the space and don’t wish to train your plants you can let them run wild and grow one massive main cola too. It’s totally up to you.
Growing
Your plant will continue to veg until the days start to get shorter. The summer solstice falls on June 21 and shortly after this point your outdoor cannabis plants will begin to show signs of flowering. It is at this point you will need to determine the sex of your plants. There are numerous resources, photos and tips for this online either know what your looking for or do your research and make sure you remove any male plant and make sure that you wither destroy them or get them somewhere they have no chance of pollinating your lovely females. I like to have all of my training done before plants start to flower and aim to wrap it up pretty quickly if it’s not quite finished. From this point forward keeping your plants happy is your number one concern. Everything that can be done to keep humidity and temperature in check during flowering should be done. Make sure your plants have adequate air flow so as to avoid mold problems. Adjust your feeding schedule to provide the plants with the nutrients they need. At this point they will want more phosphorus and potassium and some good compost teas with molasses and seabird guano can really go a long way in charging up your soil for the flowering phase of your girls life cycle.
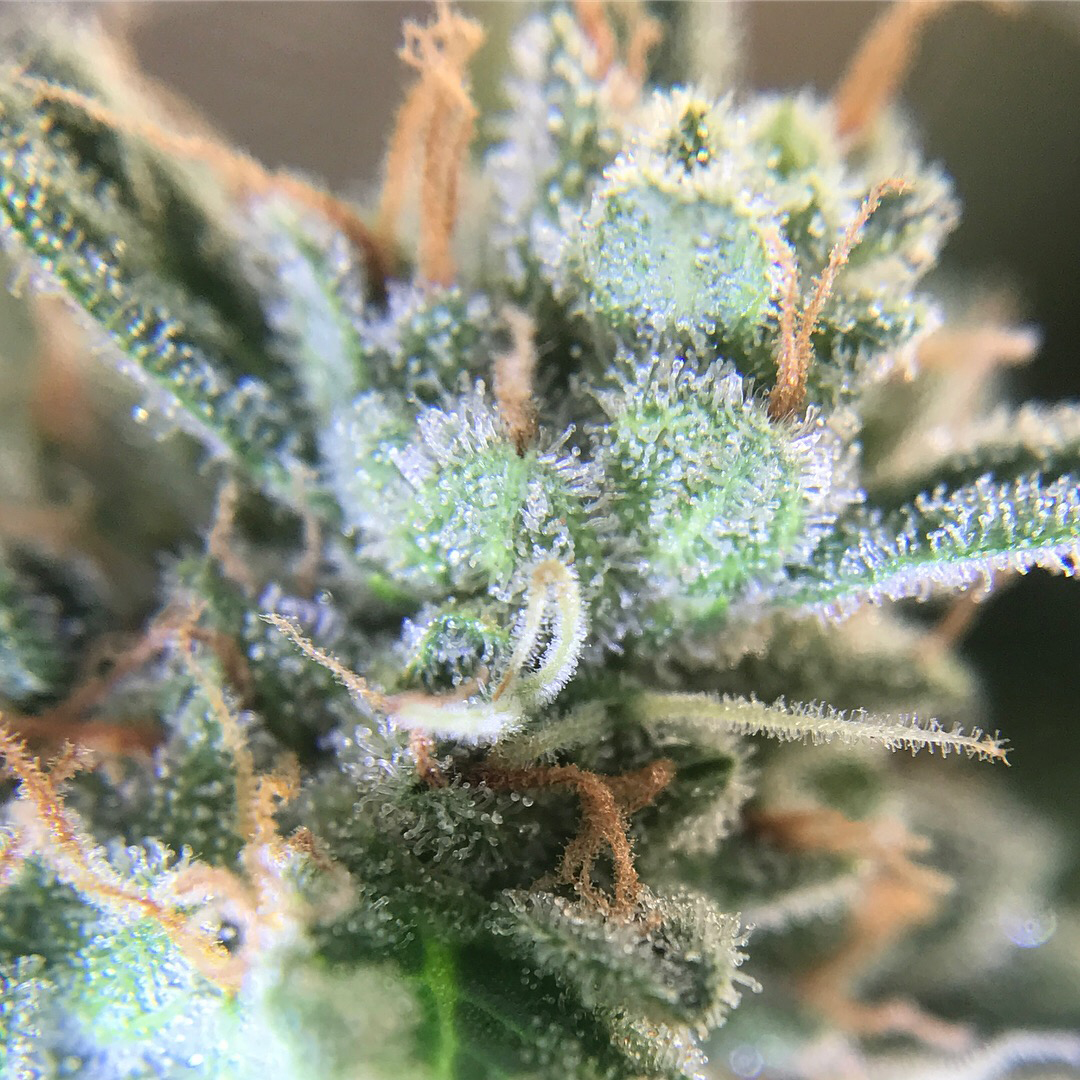
When to harvest?
So your buds are packing on the trichomes and the greenhouse is smelling sweet, how do you know when its time to harvest your crop? I like to use a jeweler’s loupe to observe the trichomes. These tiny white clear and amber mushroom shaped structures will help indicate when it is time to harvest. A good rule to start with is aiming to harvest when you have mostly cloudy not clear trichomes and 30-50% amber colored trichomes. There’s a wealth of information online about this topic and you will need to find a system that works best for you.
Drying, trimming and curing
I’m going to summarize this big time because just like every other part of growing cannabis there’s a ton of information on this process and you can make it as complicated or simple as you want. That being said taking special care during these steps can be the difference between a good harvest and a great harvest. Immediately after harvest I like to give my buds a once over wet trim. Being sure to save sugar leafs for use in edibles or hash production. Next you must dry out your buds. You don’t want to do this to fast and you don’t want to do it too slowly. Hanging your buds upside down in a dark, well-ventilated, secure and clean space is step one. Your buds should be left to dry until the stems are brittle enough that they pop when bent but don’t quite snap. Before curing I give the buds their final trim, manicuring for appearance and removing smaller sugar leaves that may have been left behind during the wet trim. Again be sure to save your time for edibles or hash. Next comes the cure. For me this is the hardest part because like you I just want to smoke the buds and have all of that hard work payoff. Trust me it will be better if you wait. Curing requires that you place all your bud into an airtight container or containers. For the first couple weeks you should then open the jar for 30 minutes 4 times a day or so I like to cure my cannabis for at least a month before starting to smoke it.. If you can control the humidity of your cure; even better. I plan on using the Cvault a humidity controlled curing container on my next cycle.